Building a RESTful Web Service
RESTful (Representational State Transfer) web services have become a standard for building scalable and maintainable APIs. In this blog post, we'll guide you through the process of building a RESTful web service, covering the fundamental principles and practical steps to create a robust and efficient API.
Understanding RESTful Principles
REST is an architectural style that emphasizes a stateless client-server communication model. Here are some key principles of RESTful web services:
1. Resource-Based URL Design
Design your URLs around resources. A resource is any entity that can be identified and manipulated, such as users, products, or articles. Use nouns to represent resources, and make your URLs intuitive and hierarchical.
Example:
GET /api/users
POST /api/users
GET /api/users/{id}
PUT /api/users/{id}
DELETE /api/users/{id}
2. Use HTTP Methods
RESTful services leverage HTTP methods to perform operations on resources. Common HTTP methods include GET (retrieve), POST (create), PUT (update), and DELETE (delete).
3. Stateless Communication
Each request from a client to a server should contain all the information needed to understand and process the request. The server should not store any information about the client's state between requests.
Practical Steps to Build a RESTful Web Service
Now, let's dive into the practical steps of building a RESTful web service using a popular framework. For the purpose of this post, we'll use Inspira, a lightweight Python web framework.
Create a new directory for your project
$ mkdir restful_web_service
$ cd restful_web_service
Create and activate a virtual environment
$ python -m venv venv
$ source venv/bin/activate
Install Inspira
$ pip install inspira
Project Initialization
To begin your project, initiate it by executing the following command:
$ inspira init
Generate Database file
Generate a database file using the following command:
$ inspira new database --name mydb --type sqlite
File Generation
Execute the following commands to generate controller, repository, model, and service files:
$ inspira new controller user
$ inspira new repository user
$ inspira new service user
$ inspira new model user
Define Data Models
To effectively represent your resources, you need to create data models. Let's open the user.py file and structure it as follows:
from sqlalchemy import Column, Integer, String
from database import Base


class User(Base):
    __tablename__ = "users"
    id = Column(Integer, primary_key=True)
    name = Column(String(50), nullable=True)
    email = Column(String(120), unique=True, nullable=True)

    def __init__(self, name: str, email: str):
        self.name = name
        self.email = email

    def __repr__(self):
        """
        Define a string representation for the User model.
        """
        return f"<User(id={self.id}, name={self.name}, email={self.email}>"
The User model represents the user entity in the database and includes fields such as id, name, and email.
The __repr__ method is implemented to provide a meaningful string representation of the User model for debugging and
logging purposes.
User Repository: Populating the Database
Now, let's delve into the user_repository.py file to introduce a new method that facilitates populating the database with new user data. Follow the steps below to enhance the repository's functionality:
from sqlalchemy.exc import SQLAlchemyError

from database import db_session
from src.model.user import User


class UserRepository:

    def get_all_user(self):
        return db_session.query(User).all()

    def get_user_by_id(self, id: int):
        return db_session.query(User).filter_by(id=id).first()

    def create_user(self, user: User):
        try:
            db_session.add(user)
            db_session.commit()
            return True
        except SQLAlchemyError as e:
            db_session.rollback()
            print(f"Error creating user: {e}")
            return False
In the above code snippet, we've added a create_user method to the UserRepository class.
User Service: Introducing User Creation
Next, we'll explore the user_service.py file to incorporate a new method for creating users.
from src.model.user import User
from src.repository.user_repository import UserRepository


class UserService:
    def __init__(self, user_repository: UserRepository):
        self._user_repository = user_repository

    def get_all_user(self):
        return self._user_repository.get_all_user()

    def create_user(self, name: str, email: str):
        new_user = User(name, email)

        return self._user_repository.create_user(new_user)
In this revised code snippet, we've introduced a create_user method within the UserService class.
This method takes the user's name and email as parameters, creates a new User instance, and delegates the user creation process to the underlying UserRepository.
The method returns a boolean indicating whether the user creation was successful.
This addition to the UserService enhances its capabilities, providing a streamlined way to create users while maintaining separation of concerns between the service and repository layers.
User Serializer Module
Create a new file called user_serializer.py within the serializers module and include the following content:
from src.model.user import User


class UserSerializer:

    @staticmethod
    def serialize_only_email(user: User):
        return {
            "email": user.email
        }

    @staticmethod
    def user_all_fields(user: User):
        return {
            "id": user.id,
            "name": user.name,
            "email": user.email
        }
In this module, the UserSerializer class provides two static methods for serializing user objects.
The serialize_only_email method focuses on extracting and returning the email field, while the serialize_all_fields method encompasses the serialization of all available fields within a dictionary.
User Controller: Handling User Requests
Now, let's explore the UserController in the user_controller.py file, focusing on the methods for retrieving and creating users.
from inspira.decorators.http_methods import get, post
from inspira.decorators.path import path
from inspira.responses import JsonResponse
from inspira.requests import Request

from src.serializers.user_serializer import UserSerializer
from src.service.user_service import UserService


@path("/users")
class UserController:

    def __init__(self, user_service: UserService, serializer: UserSerializer):
        self._user_service = user_service
        self._serializer = serializer

    @get()
    async def get_users(self, request: Request):
        users = self._user_service.get_all_user()
        serialized_users = [self._serializer.user_all_fields(user) for user in users]

        context = {
            "users": serialized_users
        }

        return JsonResponse(context)

    @post("/create")
    async def create_user(self, request: Request):
        body = await request.json()
        name = body['name']
        email = body['email']

        success = self._user_service.create_user(name, email)

        if success:
            return JsonResponse({"message": "User successfully created"})
        else:
            return JsonResponse({"message": "Failed to create user"}, status_code=500)
The get_users method retrieves all users, and the create_user method handles the creation of a new user based on JSON data received in the request body.
The success or failure of user creation is reflected in the JSON response.
This structure ensures a clean separation of concerns, with the UserController handling HTTP-related concerns and delegating user-related operations to the UserService.
Migrations
To initiate the creation of the user table, execute the following command to generate a migration file:
$ inspira new migration create_table_users
This command will create the migration file in the migrations folder.
Open the file and make the necessary modifications as shown below:
CREATE TABLE users (
    id INTEGER NOT NULL,
    name VARCHAR(50),
    email VARCHAR(120),
    PRIMARY KEY (id),
    UNIQUE (email)
);
Now run the following command to apply the migration:
$ inspira migrate
Starting the Server
After generating your app and setting up necessary resources, start the server with the following command:
$ uvicorn main:app --reload
Using Postman to Interact with the RESTful Service
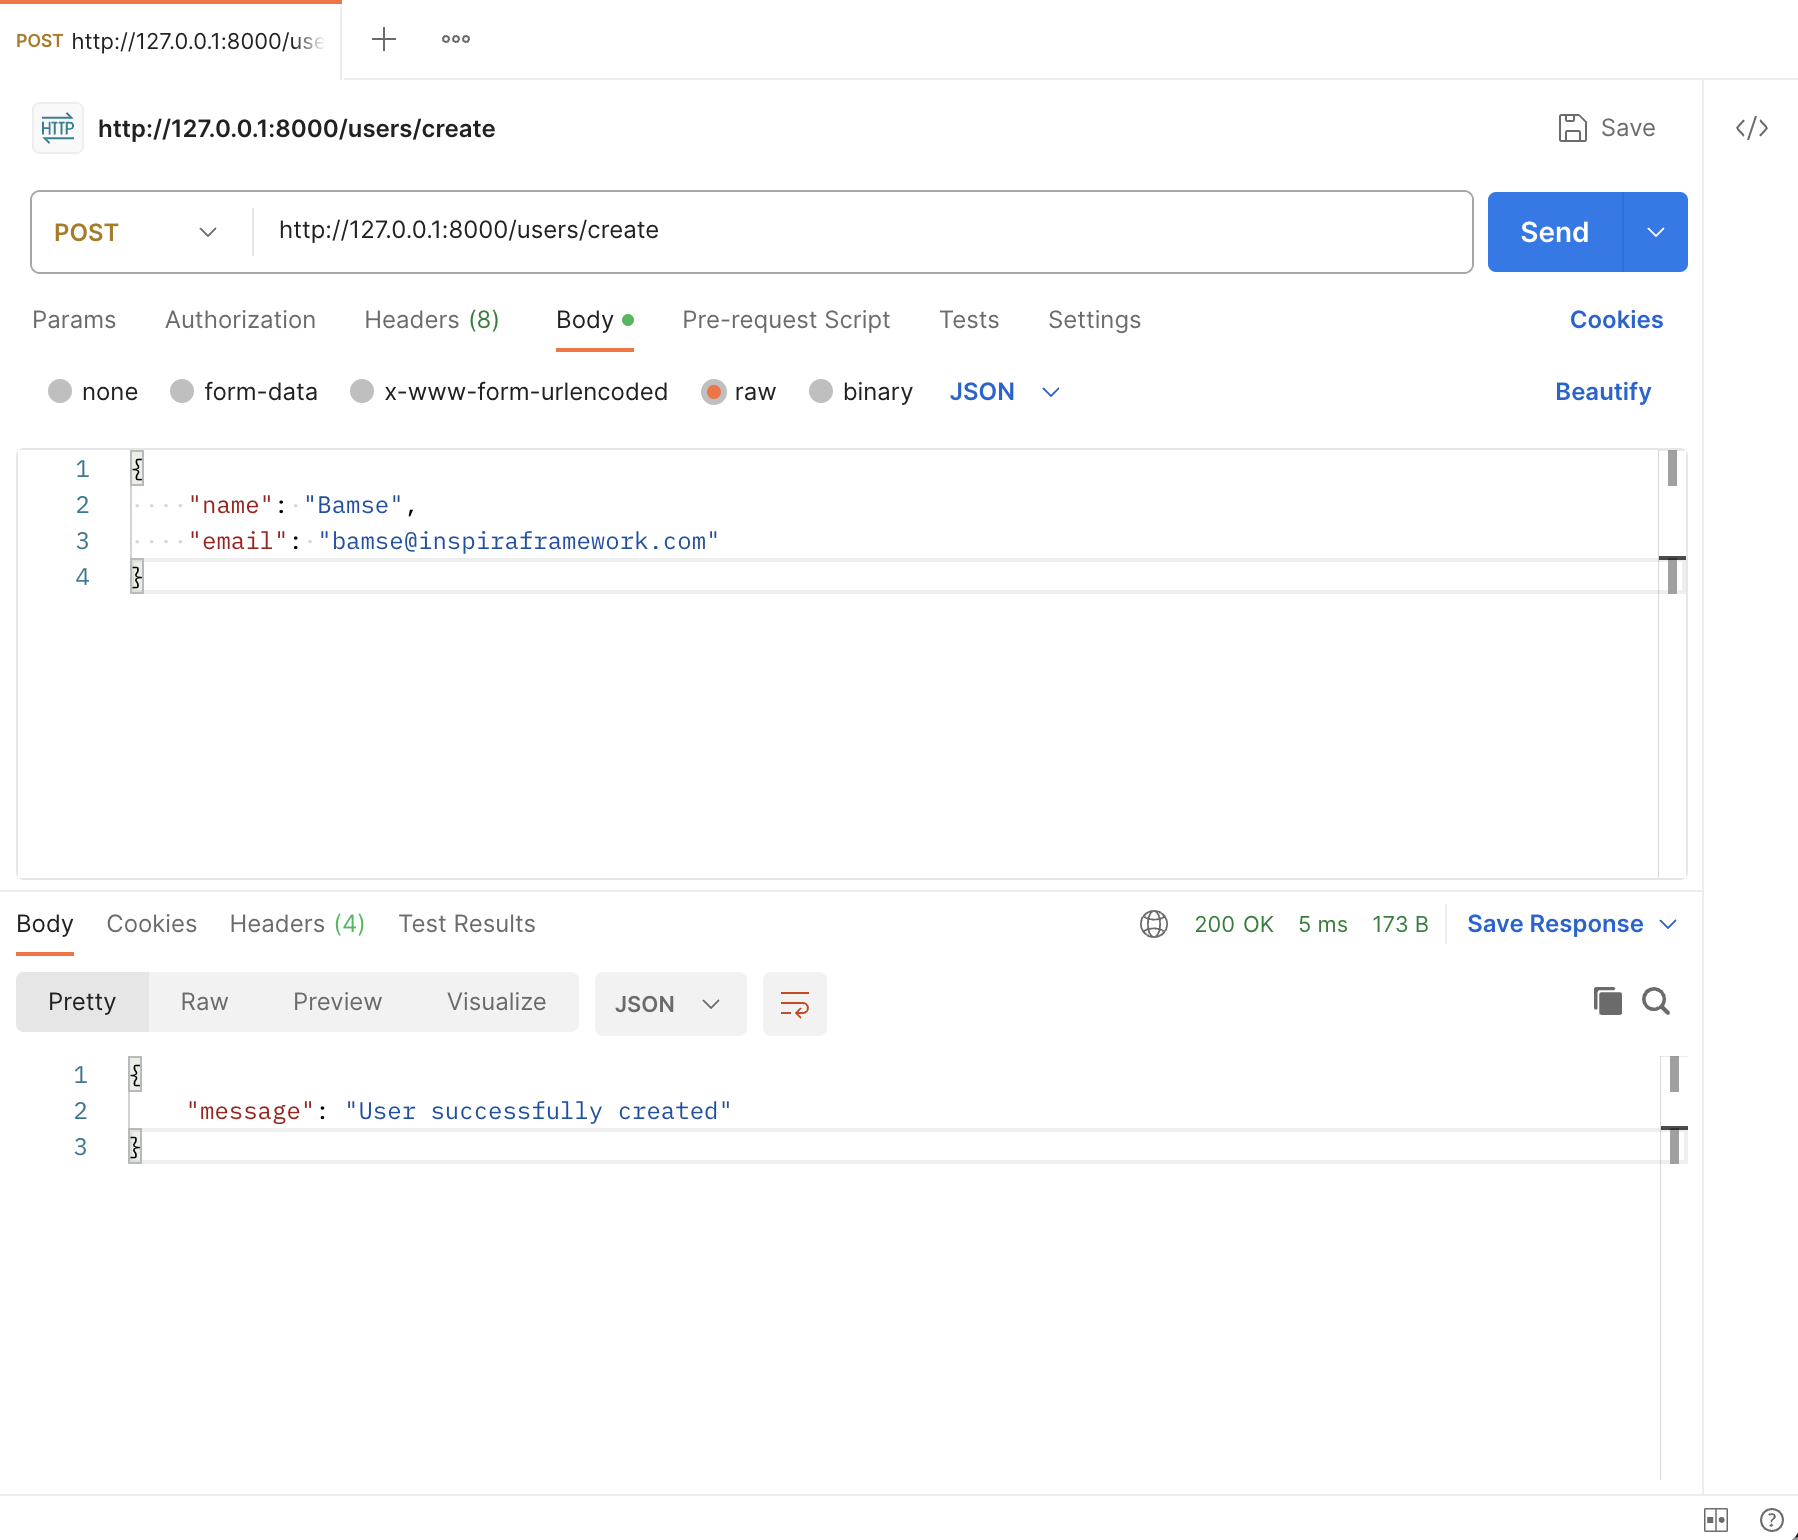
Make a POST request to http://127.0.0.1:8000/users/create using Postman with the following payload:
{
    "name": "Bamse",
    "email": "bamse@inspiraframework.com"
}
Verify the Created User:
After creating the user, make a GET request to http://127.0.0.1:8000/users to see the newly created user in the response:
{
    "users": [
        {
            "id": 1,
            "name": "Bamse",
            "email": "bamse@inspiraframework.com"
        }
    ]
}
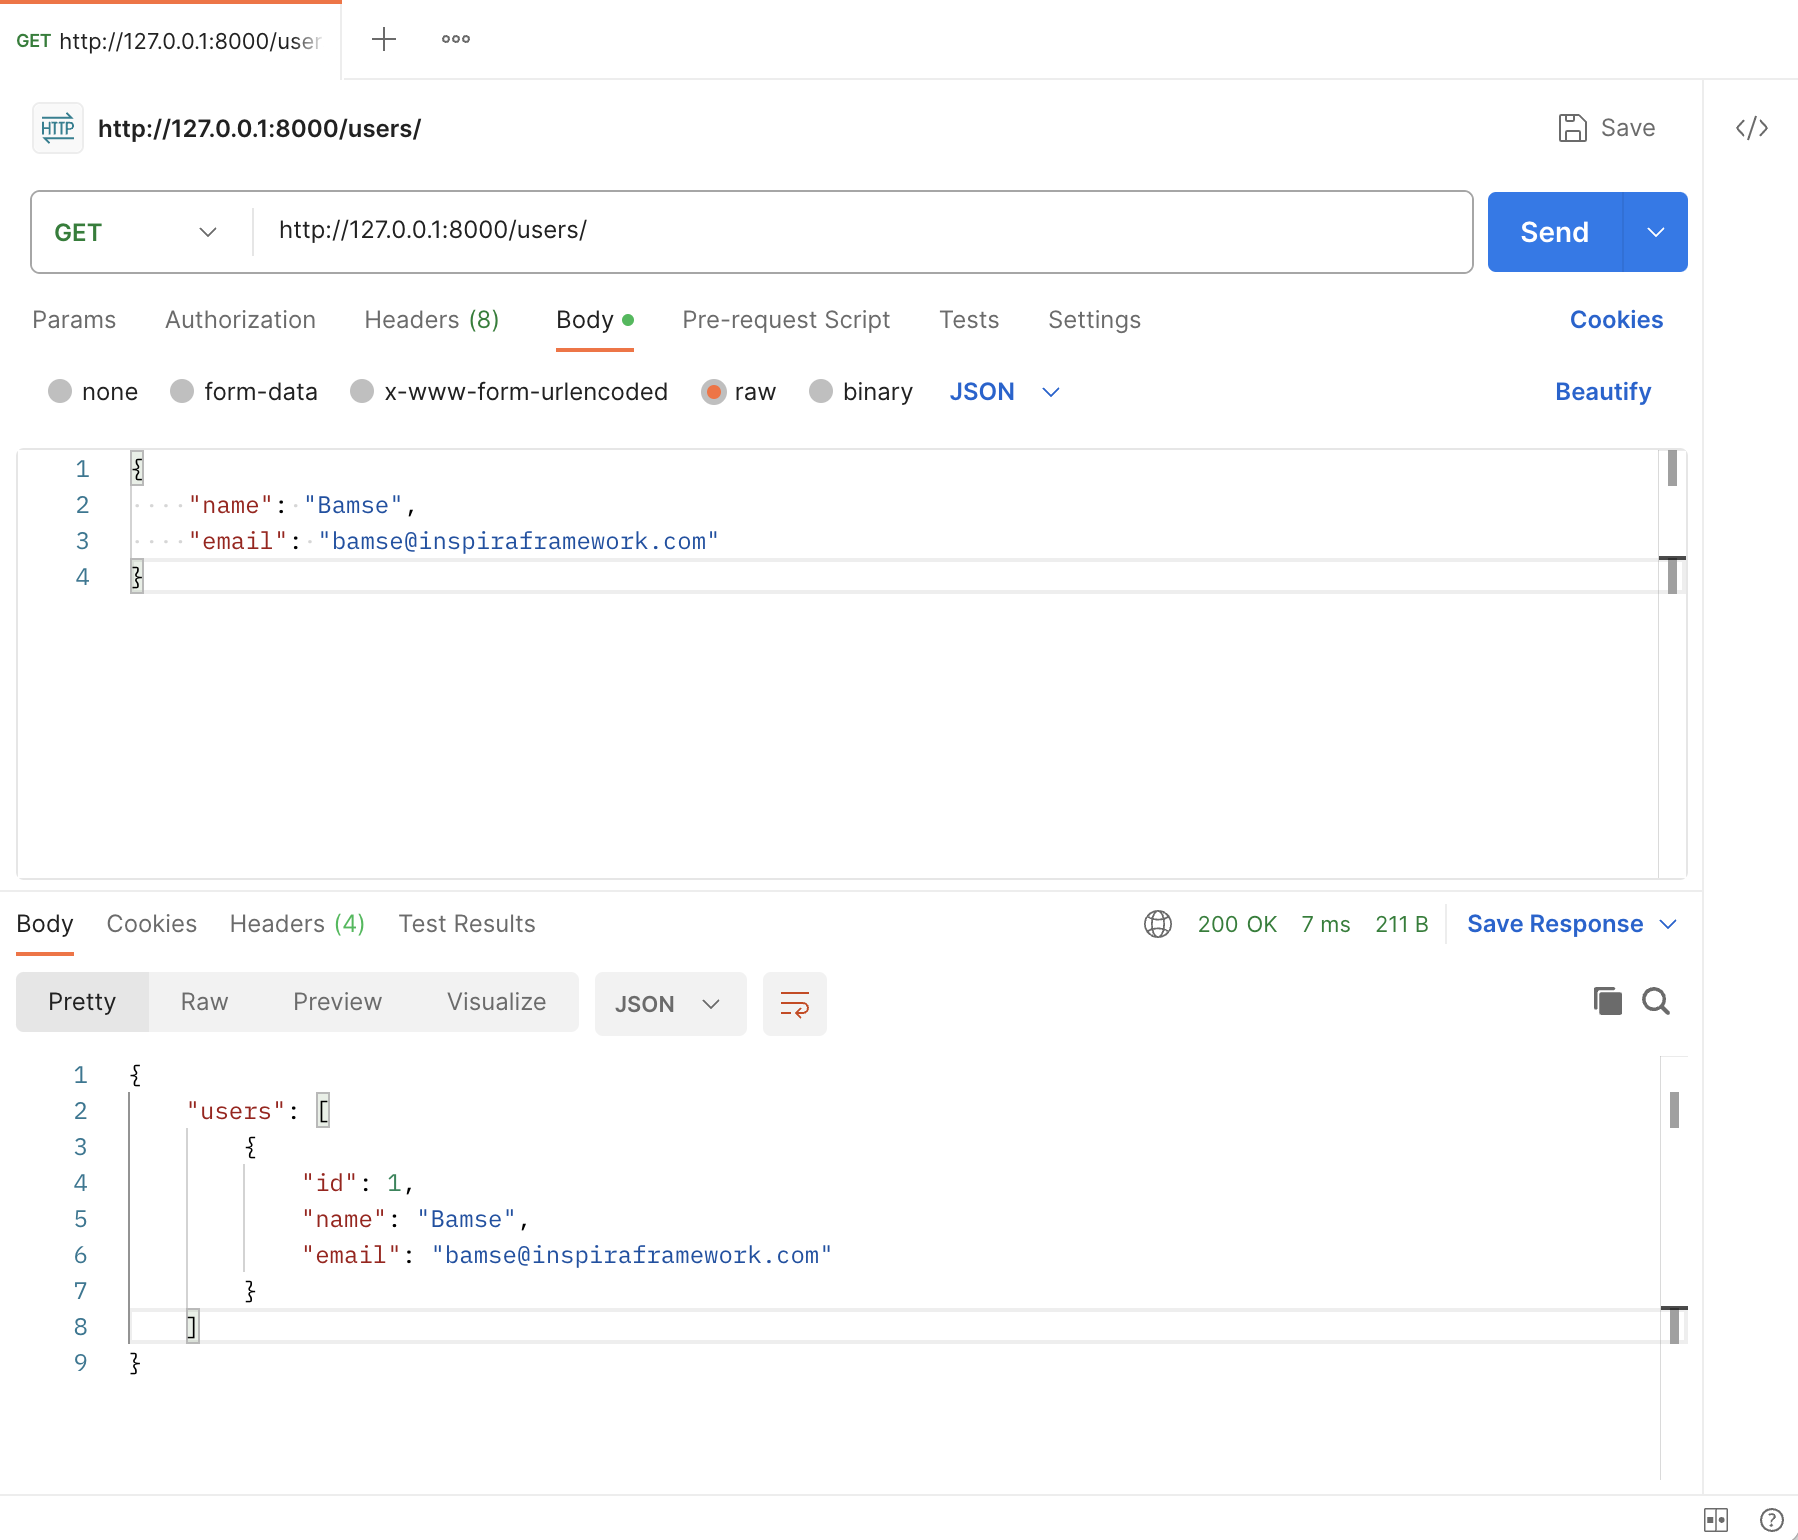
Now, you've successfully used Postman to create a user via a POST request and verified its presence with a subsequent GET request.
Conclusion
Building a RESTful web service involves adhering to REST principles and implementing CRUD operations using a web
framework.
Whether you're creating a simple API or a complex system, understanding these principles will guide you
towards building scalable and maintainable web services.
Remember to consider factors such as authentication, validation, and error handling to create a secure and reliable API.
The code is available on GitHub
Happy coding!