Using WebSocket to build an interactive web application.
Getting Started
To begin, follow these commands to install Inspira and set up the project directories:
$ mkdir websockets
$ cd websockets
$ python -m venv .venv
$ source .venv/bin/activate
$ pip install inspira
$ inspira init
$ inspira new controller greetings
$ inspira new controller chat --websocket
The --websocket flag tells us that the controller is meant for handling websockets.
Creating the Templates Folder
In the project's main directory, create a folder named templates alongside the main.py file.
Create the index.html within the newly created folder using the commands below:
$ mkdir templates
$ touch templates/index.html
Now, insert the provided content into the index.html file:
<!DOCTYPE html>
<html lang="en">
<head>
    <meta charset="UTF-8">
    <meta name="viewport" content="width=device-width, initial-scale=1.0">
    <title>WebSocket Test</title>
</head>
<body>
    <h1>WebSocket Test</h1>
    <div id="log"></div>
    <br>
    <form id="form">
        <label for="text">Input: </label>
        <input type="text" id="text" autofocus>
        <button type="submit">Send</button>
    </form>

    <script>
        const log = document.getElementById('log');
        const form = document.getElementById('form');
        const input = document.getElementById('text');

        // Create a WebSocket connection
        const socket = new WebSocket('ws://localhost:8000/chat');

        // Log WebSocket open and close events
        socket.addEventListener('open', () => {
            logMessage('WebSocket connection opened');
        });

        socket.addEventListener('close', () => {
            logMessage('WebSocket connection closed');
        });

        // Handle messages received from the WebSocket
        socket.addEventListener('message', event => {
            const message = event.data;
            logMessage(`Received: ${message}`);
        });

        // Handle form submission to send a message
        form.addEventListener('submit', event => {
            event.preventDefault();
            const message = input.value.trim();

            if (message !== '') {
                // Send the message through the WebSocket
                socket.send(message);

                // Log the sent message
                logMessage(`Sent: ${message}`);

                // Clear the input field
                input.value = '';
            }
        });

        // Function to log messages in the UI
        function logMessage(message) {
            const p = document.createElement('p');
            p.textContent = message;
            log.appendChild(p);
        }
    </script>
</body>
</html>
Open the greeting_controller.py file and modify it to resemble the following:
from inspira.decorators.http_methods import get
from inspira.decorators.path import path
from inspira.responses import TemplateResponse
from inspira.requests import Request


@path("/greetings")
class GreetingController:

    @get()
    async def index(self, request: Request):
        return TemplateResponse("index.html")
This endpoint will render the index.html template and establish a connection to /chat.
Now, navigate to the chat_controller.py file, and you will find pre-generated code that is ready for use.
from inspira.decorators.websocket import websocket
from inspira.websockets import WebSocket


@websocket("/chat")
class ChatController:

    async def on_open(self, websocket: WebSocket):
        print("Inside On Open")
        await websocket.on_open()

    async def on_message(self, websocket: WebSocket, message):
        print(f"Inside On Message. Received message: {message}")

        # Modify the message before echoing back
        modified_message = f"Server response to: {message.get('text', '')}"

        await websocket.send_text(modified_message)

    async def on_close(self, websocket: WebSocket):
        print("Inside On Close")
        await websocket.on_close()
on_open Method:
Called when a WebSocket connection to the /chat endpoint is opened.
on_message Method:
Triggered when a message is received on the WebSocket connection.
Prints the received message and then modifies it before sending it back to the client.
The modified message is sent back to the client using the send_text method of the WebSocket instance.
on_close Method:
Invoked when the WebSocket connection is closed.
Launching the Server
Initiate the server with the following command:
$ uvicorn main:app --reload
Testing the Service
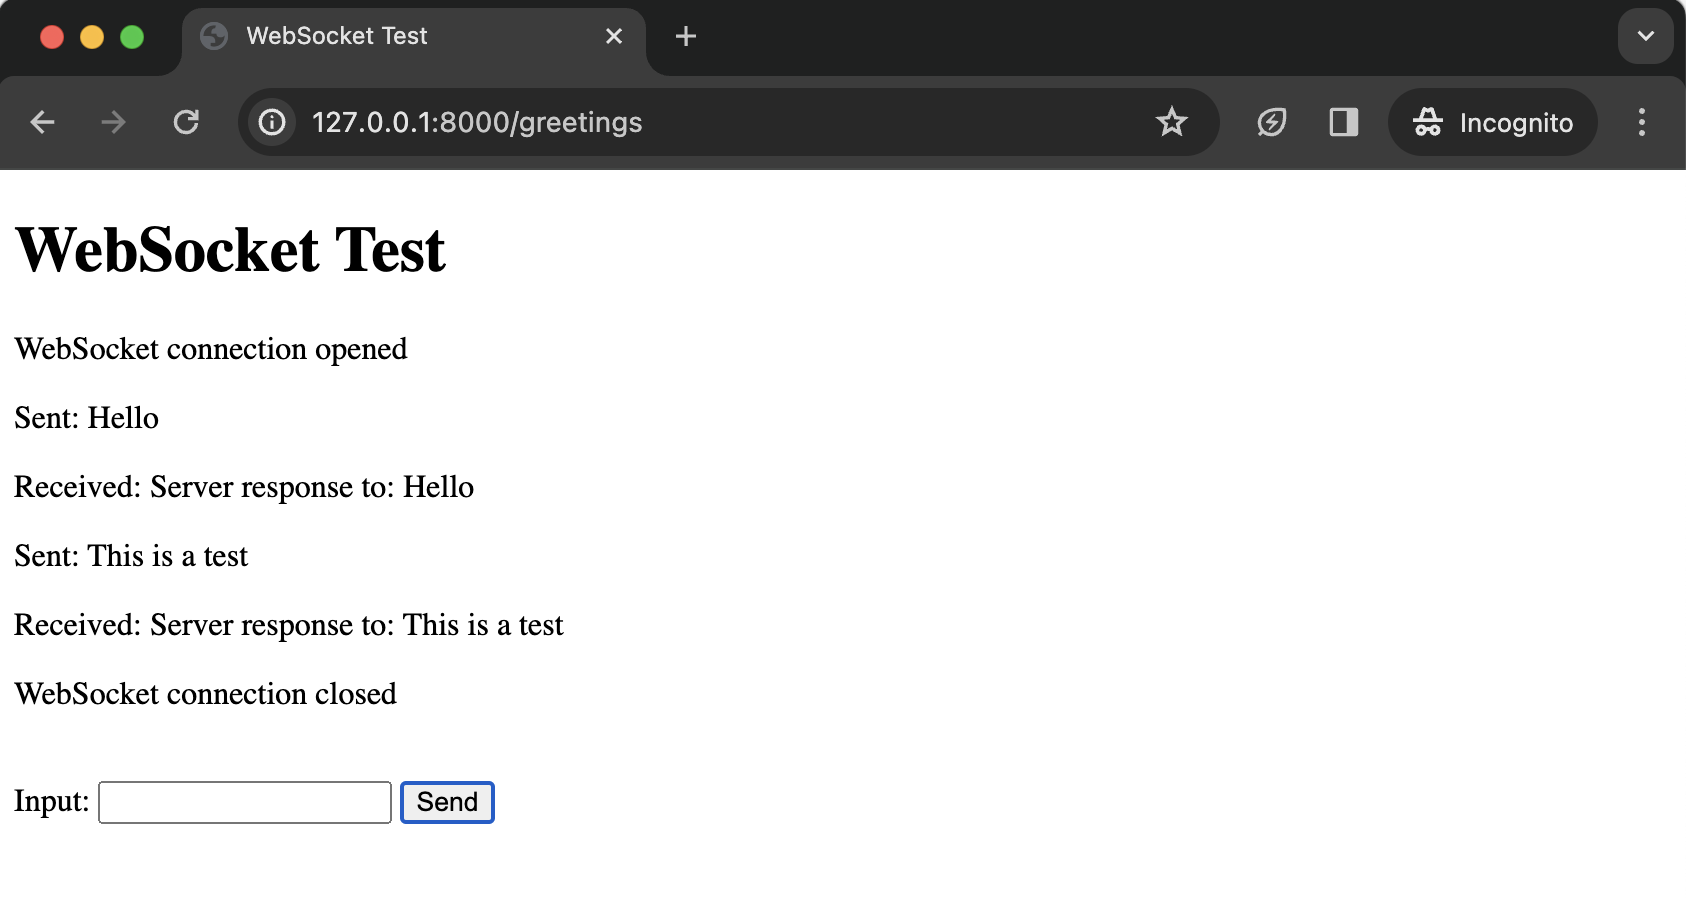
Visit http://localhost:8000/greeting in your browser to interact with the form.
Enter the required details and submit the form for results.
Conclusion
Getting up and running with websockets in Inspira is a breeze. It's a straightforward process that makes integrating real-time communication into your applications quite accessible.
The code is available on GitHub
Happy coding!